

Problem Requirements Document
In the ever-evolving world of software development, understanding and addressing user pain points is crucial for delivering top-notch products and services. HashiCorp developed a comprehensive Problem Requirements Document (PRD) to serve as an invaluable tool for outlining the problems faced and proposing effective solutions.
This PRD example showcases a carefully crafted document that covers all aspects of the problem, from the background and problem statement to the personas affected and the phased requirements for implementation. By breaking down the problem into manageable phases, an iterative implementation can be achieved, ensuring that users experience significant improvements with each step.
[PRD] Confusing widget creation workflow
Summary: Community members struggle to finish the final step in releasing widgets.
The Problem Requirements Document (PRD) begins with a brief introduction that explains the goal of the PRD. While the introduction section is read first, it should be authored last. Writing the overview last allows the author to summarize the final content of the PRD, rather than write an introduction without knowing the end result.
Background
The goal of the background section is to provide the reader with helpful context before diving into the problem domain. Provide sufficient details to properly educate the reader on the problem domain. In order for a reader to understand the content of the PRD, they must first understand the context. That context setting is the goal of the background section. Visual explanations are encouraged if applicable.
Problem
This is the heart of the PRD as it simplifies the user research into clear problem statements. Each of the problems should clearly map to the problems identified by the user research and the corresponding personas defined below. The personas should be generalized versions of the actual interviewed users.
Personas
- Affected Persona 1 has troubles developing with this problem
- Affected Persona 2 has troubles operating with this problem
- Affected Persona 3 has troubles securing with this problem
Requirements and Phases
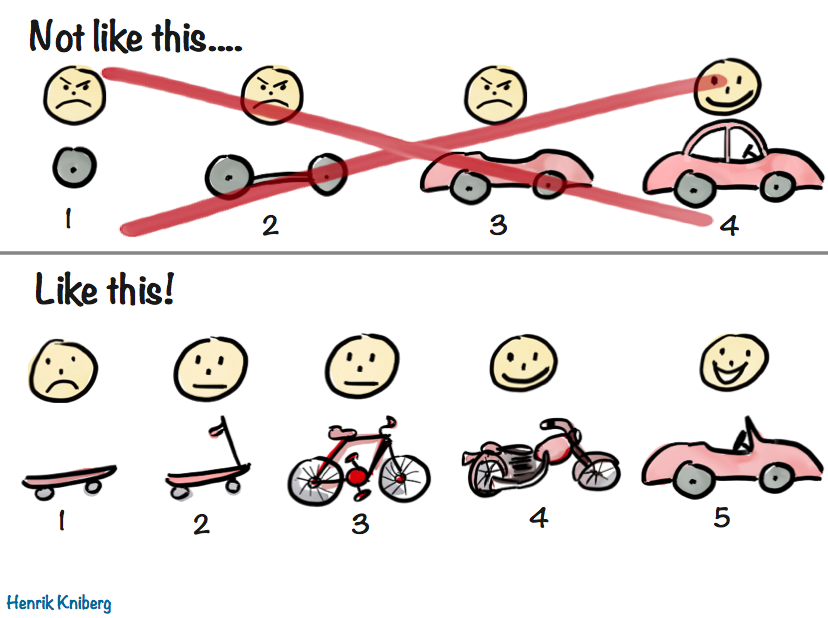
The problem is broken down into phases to enable iterative implementation. Each phase:
- Builds value on the previous phase and therefore they are defined in sequential order of value. There is no need to define priority as that’s inferred from ordering.
- Is not considered complete until all of the requirements are fulfilled.
- Should provide end-to-end value. That is, even if only the phase can be addressed then this should provide value and feel like a new feature/solution for the user:
Some PRDs will only have one phase; that is completely fine.
<Phase 1>
The title defines the objective for solving the problem and references the persona (e.g. “Must be easier for policy writers to create Terraform mock data for sentinel tests”).
<Requirement 1>
While each phase focuses on a single problem from the users perspective, it may need to be broken down into multiple requirements to address specific problems with individual components, features, docs, etc. There are a few things to consider when writing the requirement:
- Priority should not be defined for the requirements as they are all considered to be required for the phase.
- If a requirement is not considered to be of equal priority then consider splitting it into a separate phase.
- Each requirement may necessitate one or more RFCs.
Acceptance Criteria
The acceptance criteria should be written like test cases for the requirement. This should be written objectively so anybody can validate the criteria is met prior to release.
Considerations
Each requirement should have a “Considerations” section which is a consideration for the RFC writer. It should almost always be a question, not a suggestion. They could be dismissed outright or answered within the RFC to call back to the consideration itself. During the review process it is likely that most comments will target the considerations; in most cases these comments will need to be deflected to the RFC.
- <Consideration>
<Phase 2>
<Description>
<Requirement 1>
<description>
Acceptance Criteria
Considerations
User Research
This section is the most important as it grounds the PRD in real, experienced user problems. For the author the goal of this section is to collect high-quality research which will be used to identify common patterns across users. The better the research, the easier it is to determine patterns, and the simpler the problem statement can be. For readers this section sets a concrete context for understanding the core problem.
<Customer>
For each customer include a link to the interview notes, a short paragraph explaining the state of their workflow today, and key takeaways
- <Problem/Takeaway>
- <Problem/Takeaway>
Approvals
Red names still require approval, green names with a checkmark have approved.
Each of the representative stakeholders must approve the PRD before it proceeds to kick-off and RFC writing. Sign-off by stakeholders requires these to be satisfied:
- The release summary defines which acceptance criteria are in scope.
- Engineering and Product Management agree on the target release.
- Provides sufficient clarity to author the RFC.
- Schedule a meeting with engineering and design to review the PRD.
Approved names will have a ✅
Project Engineering Lead:
Product Manager:
VP of Product:
Sales Engineer Lead:
ProductDesign Lead:
[Add other approvers as necessary]
Style Notes
All PRDs should follow similar styling and structure to ease reading. "Beautiful is better" is a core principle of HashiCorp and we care about the details.
Heading Styles
"Heading 2" should be used for section titles. We do not use "Heading 1" because aesthetically the text is too large. Google Docs will use Heading 2 as the outermost headers in the generated outline.
"Heading 3" should be used for sub-sections.
Further heading styles can be used for nested sections.
Lists
When making lists, it is common to bold the first phrase/sentence/word to bring some category or point to attention. For example, a list of API considerations:
- Format should be widgets
- Protocol should be widgets-rpc
- Backwards compatibility should be considered.
Typeface
Type size should use this template's default configuration (11pt for body text, larger for headings), and the type family should be Arial. No other typeface customization (eg color, highlight) should be made other than italics, bold, and underline.
Code Samples
Code samples should be indented (tab or spaces are fine as long as it is consistent) text using the Courier New font. If syntax highlighting is included, please ensure the highlighted syntax is the proper font size and using Courier New font so non-highlighted samples aren't out of place.
CLI output samples are similar to code samples but should be highlighted with the color they'll output if it is known so that the RFC could also cover formatting as part of the user experience.
In the ever-evolving world of software development, understanding and addressing user pain points is crucial for delivering top-notch products and services. HashiCorp developed a comprehensive Problem Requirements Document (PRD) to serve as an invaluable tool for outlining the problems faced and proposing effective solutions.
This PRD example showcases a carefully crafted document that covers all aspects of the problem, from the background and problem statement to the personas affected and the phased requirements for implementation. By breaking down the problem into manageable phases, an iterative implementation can be achieved, ensuring that users experience significant improvements with each step.


